preface
The first blender tutorial, in the future, I will try to update a simple and easy to understand course every week, and then learn more interesting knowledge points. I hope you can support me more.
If you like my tutorial, you can star mark us, so you won't miss any tutorial~
From the next tutorial, we will use video and text tutorials to explain. Oh, please look forward to it~
The source files and materials are downloaded at the bottom

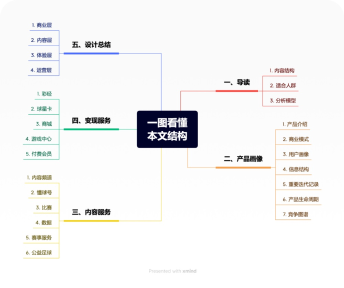
catalogue
1. Precautions for software startup settings (general)
2. Render attribute and output attribute settings
3. Create pumpkin shape
4. Set your favorite pumpkin expression texture
5. Create a gentleman's hat
6. Create background & add material
7. Global lighting settings
8. Set camera & Export pictures
Precautions for software startup settings (general)
1. Software download
You can go to Blender's official website to download any version of the software directly. It is recommended that 2.93 be consistent with me
2. Settings after software startup
Setting Chinese: top menu - edit preferences interface translation language

Notebook digital shortcut settings: Edit - preferences - input - check the analog digital keyboard, the MAC mouse can also set the analog three button mouse Oh ~ graphics card rendering settings: This refers to that when using the cycles renderer, win can check both GPU and CPU in Edit - preferences - System - CUDA
Render attribute and output attribute settings
This article deals with the reflection of the light inside the pumpkin, so this tutorial uses the cycles renderer
Render attribute settings
Rendering engine: GPU calculation is selected for n-card devices. The MAC does not support GPU of cycles. You can choose CPU
Noise reduction: render check and select Optix
Color management: slide to the bottom and adjust the exposure to 1.5, which is very helpful for newcomers
Output attribute settings
Specification and size: the resolution is the length and width, which can be set according to various needs, or just like me, 1920px 1080px,100%

- Didi didi ~ ~ the text begins
Create a pumpkin shape
Before creating the pumpkin, press "a", "X" to delete all the models
(A: select all, X: delete)
In this lesson, pumpkin is made through polygon modeling and Boolean. First, define the basic shape cylinder.
Create cylinder: shift, a-mesh-cylinder
(shift, a: create various graphics, the root of all things)
Don't move after creating, and then look at your lower left corner. If you don't see it, please delete it and re create the column
Add cylinder: set vertex to 12

Adjust the center point of the cylinder (this is my personal habit, so that the scale of the model can be reduced based on the ground)
1. Press the tab keyboard to switch to edit mode
(tab: the fastest way to switch between edit mode and object mode)
2. You can see a fully lit cylinder
3. Press the shortcut keys g and Z respectively, hold down Ctrl and drag the mouse to make the cylinder on the ground
(G: displacement, Z: keep the displacement on the z-axis, press and hold Ctrl during displacement: it can make the moving distance integer)

4. CTRL, 3 switch to face mode selection, and select the top layer of the column
(ctrl, 1, Ctrl, 2 and Ctrl, 3 correspond to point, line and face modes respectively)
This shortcut key of MAC is invalid. It can also be selected manually, which is in the upper left corner
5. Reduce the height of the column, press g and Z respectively, press and hold shift, Ctrl, drag the mouse down and jump three times. The specific values are shown in the figure below
(hold down shift and Ctrl during displacement: the moving distance can be dragged by decimal point)
6. Suspend the mouse pointer on the column, Ctrl, R, and scroll the wheel once
(ctrl, R: circular cutting, the object can be divided by lines) 7. Click the left mouse button and press ESC to end the operation
8. Since the selection mode will be automatically switched to "line selection" in that step, we need to readjust to face mode, Ctrl, 3
Press ALT and click the mouse as shown in the figure below to select the circle of faces
9. Zoom in on the selected item, press s, hold down Ctrl and pull it out. After pulling, you can see if the data is the same as in the figure
(s: zoom, hold down Ctrl: the same as moving, you can make the zoom value integer) 10. Select the top and bottom of the column at the same time, press shift to select multiple, then press I, drag the mouse, as shown in the figure below, and the value is as shown in the figure below (I: interpolate the surface, you can squeeze the surface inward)
11. Press s, Z, hold Ctrl and drag once
(press and hold s and then press Z to make the zoom move only on the Z axis) 12. Switch the line selection mode, Ctrl, 2, shift, and select any row of vertical lines 13. You can look at the top, select - select cycle - side by side 14. Ctrl, B, chamfer the lines, drag the mouse, and drag the roller once, as shown in Figure 15. Select these lines as shown in the figure below, and press and hold ALT to select all rows of lines
16. Press s, shift, Z, hold down Ctrl and drag the mouse once
(shift, Z: the X and Y axes other than the Z axis can be scaled) 17. Now you can see the shape of the pumpkin ~ ~ select the modifier on the right, select the surface subdivision, and the subdivision level can be adjusted to 3, as shown in the following figure. 18. Ctrl, 3. Face selection mode, select the top of the cylinder, press I, and zoom to the top as shown in the following figure. 19. Select the top, mesh transform spheroidize, and pull to the maximum of 20 After zooming the circle, press g and Z to press down 21 and I. after inserting the face circle, press g and Z to pull up the pumpkin~
Last step
Press tab to switch to object mode, select the object, right-click and select smooth shading

Set your favorite pumpkin expression texture
This step will become easier at first. I helped you draw these pumpkin expressions, which you can get in the package of the source file,
1. Click open the file, import - SVG, and select any expression. The following operations are the same. 2. You can see the layers on the right, with multiple folders and three layers. 3. Select these three layers at the same time, and press Ctrl, j to merge the three layers
4. We didn't see our layer in the picture because it was covered by the pumpkin. We can ignore it and operate according to what I said
Still select the expression layer, you can see the data attribute on the right, the green icon, find the geometric data, and modify the extrusion to 0.5m
Then select the upper left corner, object - set origin - origin_ Press alt, G in the geometric center to return the expression to the origin
5. Then press R, X and enter 90 from the keypad
(R: rotate, rotate 90 degrees towards the X axis)
6. Press s and enter 10 on the keypad to zoom in
(magnification 10 times) 7. Press keypad 1, and the view will be automatically adjusted to the front view

8. Adjust the expression through G and s as shown in the following figure 9. Then re adjust the extrusion to 0.02M 10. Move the expression outward along the Y axis, G, y, and intersect the pumpkin 11. Select the pumpkin in the object mode, click the lower triangle on the right, and apply subdivision 12. Select the expression in the object mode, upper left corner - object - conversion - mesh 13, upper right corner, There is a filter icon. Click on it and select the three options in turn. 13. Select the expression in object mode and hide the expression. 14. Then look at the data attributes in the lower right corner and check it automatically. 15. Select pumpkin in object mode and the modifier in the lower right corner and select Boolean. When the object selects the expression, you can see the data attributes in the lower right corner and check it automatically
16. You may have seen that the pumpkin head has been completed, but we need to make the pumpkin head transparent, so we need to make the expression empty the pumpkin
Finally, we redisplay the expression layer, select the perspective mode, and press the numeric keypad 3 to switch to the right view
It's also very simple to empty the expression. Just break the closed figure. We select the expression layer, press tab and switch to editing mode
CTRL, 3, select the face mode, frame these faces on the right, x, delete faces, Ctrl, 1, select the point mode, frame these points on the right, move g and y to the left, there are probably so many intersections, you can hide the expression again, turn off the perspective mode, and the pumpkin head has been completed
Create a gentleman hat
1. First confirm that you are in the object mode, then shift, a create a cylinder, press / key (the one next to shift), display the cylinder alone. 2. Tab switch to the editing mode. As before, a select all, G, Z, press Ctrl to move up. 3. Ctrl, 3. Face mode, select the top of the cylinder, press g, Z, enter - 14, Ctrl, R on the numeric keyboard, and circle the middle face once, Move to the bottom and leave a little distance. 5. Press Ctrl, 3 again to select the face mode and ALT to ring the circle of faces
6. Alt, e, extrude the face along the normal direction, numeric keypad 0.6 , 7. Press tab to the object mode, right modifier, open the surface subdivision, and adjust the level to 3. 8. Press tab to the edit mode, Ctrl, R, circumscribe the face once, as shown in the figure below. Continue Ctrl, R, circumscribe the brim, increase the thickness. 9. Press tab to return to the object mode, select the hat, right-click, smooth coloring, and complete the model 10. Press /, Exit the exclusive display, select the hat, and move g and Z upward, as shown in the figure below
Create background
1. Shift, a, create a new plane
2. Press s, enter 20 with the keypad, enlarge the plane, and then press g, Z, numeric keypad - 0.1
3. Switch to edit mode, Ctrl, 2-edge mode, select these two edges, press e, Z, and enter 10 with the keypad
(E: extrude, e \ Z, extrude based on Z axis) 4. Select the three intersecting edges, Ctrl, B, set the chamfer, and scroll the mouse wheel to set more faces
5. Return to object mode, select the plane, right-click, and smooth shading
Add material
1. There are three kinds of materials in total: hat, pumpkin and background. We can set them in turn. At this time, we can also switch to the rendering view to see the effect. First, select the hat, select the material attribute on the right, and create a new one. The parameters are as follows
Then there is the pumpkin. The parameters are shown in the figure below. Just choose a yellow color

Finally, the background parameters are shown in the figure below

Add light
There are three kinds of lights, the light in the pumpkin, the top light, and the blue and purple light on both sides
1. First, we add light to the pumpkin
Shift, a, create a new point light, move up a little along the Z axis, and adjust the light parameters on the right
2. Create top ray
Shift, a, create a daylight
Press g, click, and enter the data as shown in the figure below
After the movement, modify the parameters on the right
R. X, keypad input 45
3. Create ambient light
Shift, a create a face light. Enter the following values in the lower left corner

Continue to create a face light, and enter the following values to set the parameters of the light respectively
Add camera
Shift, a, create a new camera, set the parameters as shown in the figure below, and then press keypad 0 to switch to the camera perspective. We've finished a pumpkin
I've finally finished writing. I can't bear it. I'd better use video and short text tutorials for the next tutorial. It's estimated that I'm tired of writing, you look tired, and everyone is tired~~~~~
WeChat official account: LEO's Blender classroom
Powered by Froala Editor